Emergencies by definition are unplanned

prov⋅i⋅dent  [prov-i-duhnt]
1. having or showing foresight; providing carefully for the future.
2. characterized by or proceeding from foresight: provident care.
3. mindful in making provision (usually fol. by of).
4. economical; frugal; thrifty.


A trench cut through church property diverted heavy run-off threatening the building during the January 2009 flood.

Monday, August 9, 2010

The "No Grocery Shopping Challenge"


Drilling for emergencies is an ongoing reality for my fireman husband since the city of Seattle (like most metropolitan areas) prepares for catastrophic events. It makes just as much sense for families to do the same.

So starting Saturday, August 8th, we began the "No Grocery Shopping Challenge" through the end of the month. It will be doubling challenging (more like a 6-week event), since we are a family of 12 right now and things fly off the shelf at a rather alarming rate! But it's also a great opportunity to see how prepared we really are in case of a real emergency.

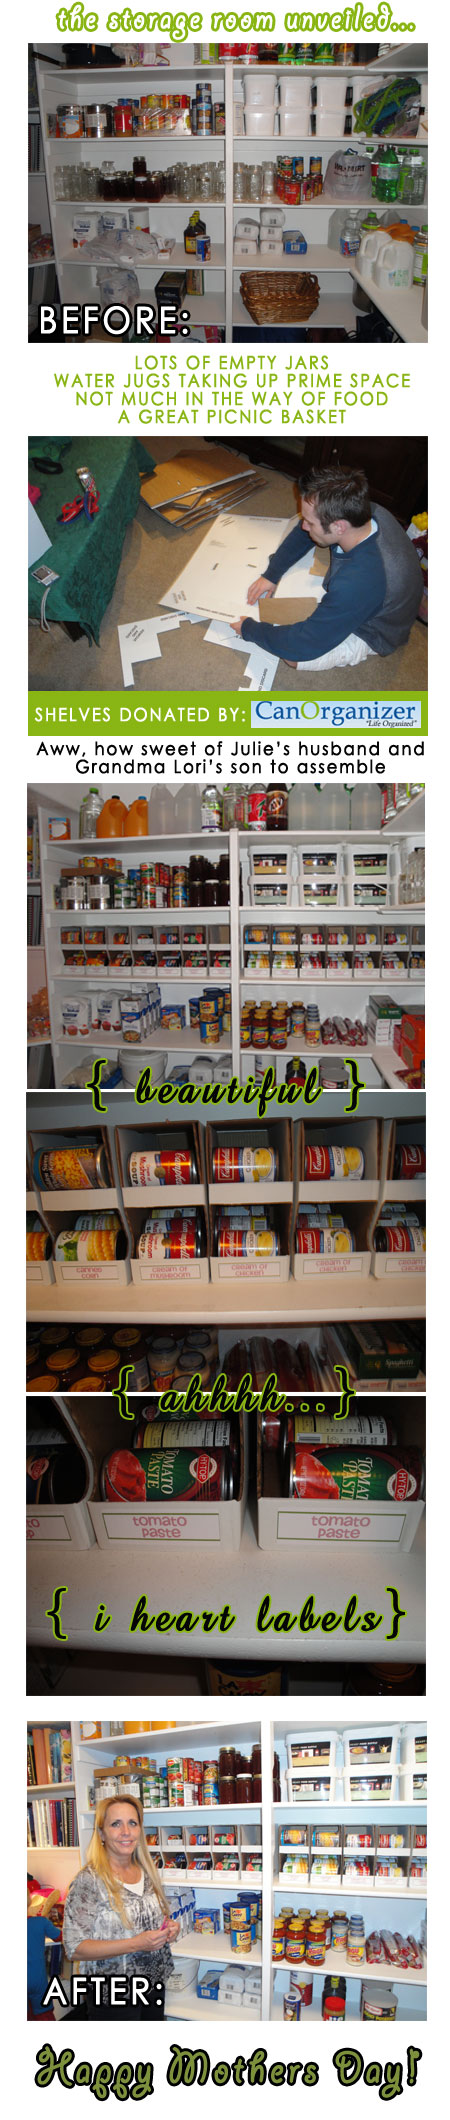
To kick things off - I took a picture of my pantry for a before and after shot and will be regularly posting our experiences.

This much I have figured out already:
I may have to hide the cheese and ration it out for special occasions since the first 2 lb. block has already disappeared. And the 30 half gallons of apple juice that I got for a killer deal ($1 a piece!) won't make it through the end of the month unless we ration those as well. When you know you can't run to the grocery store, you start thinking differently about food options!

Our menus thus far:
Saturday morning I made a huge pot of homemade chicken noodle soup and took some to a sick friend. The rest fed the whole clan through lunch and dinner (with a little help from Campbell's chicken and dumplings to make it go the distance).
Sunday we cooked kidney beans in the crockpot and made chili and cornbread for dinner. Tonight it will be chili dogs and fritos. The kids are excited!

Monday, August 2, 2010

Solar Flares and Preparing for Electrical Outages

I've been trying to think of scenarios in our area that would require emergency preparedness. All the experts say being prepared for specific emergencies is much more effective, but I never even considered an anticipated cycle of extreme solar flares that can potentially negatively affect our electronic way of life. Here's some food for thought from Totally Ready.com


Yes, there was a massive solar storm yesterday. It has been classified a solar tsunami. Scientists are expecting really magnificent auras in the night sky beginning tomorrow night. The sighting could be as far south as the southern states but probably not. In any case they will be much further south than Canada which usually gets all the fun. This could just be the beginning. We have been talking about this now for months and I would guess many of you thought I was nutty. The flares in this cycle will not take down power grids but remember we are just beginning this active sun cycle, and yes it is a cycle. Scientists are still expecting these to continue until the end of 2013 and they fear as the eruptions get worse many of the thousands of satellites in space will be disabled. That’s right, TV, cell phone, Internet…all will be affected even if the grids are not taken down on earth. Check out www.wired.com for some really spectacular videos.

Today the power went out. We knew it would. the power company was replacing the transformer. We took this as a good time to check out just how ready we are for a power outage. I made sure the freezers were full of bottles of water so things would stay frozen. I froze all of our blue ice packs and had them ready for use. I filled everything that would hold water and place jugs in the bathroom and next to the kitchen sink for hand washing. I took the foods for snacks and lunch out of the fridge and placed them in a cooler with some of the blue ice packs so we wouldn’t need to open the door. Didn’t place a sign on the door with a threat if the door were to be opened but during an outage when we don’t know exactly how long it will be out I will place that sign on the door to remind us not to open without a very specific plan of what you will grab before shutting the door quickly.

What I hadn’t done, because I hadn’t thought about it, which I will now do, was to place an object or bottle in the toilet tank so it wouldn’t take as much water to refill the tank. I realized this as I refilled the tank from a gallon of stored water and it took the whole gallon! and that didn’t even completely fill the tank. I knew it took lots of water but I just hadn’t thought to reduce the amount of water it would actually take. We dedicated one bathroom as the only on in use so monitoring supplies of water and hand sanitizer would be easier and would also save the water in the other tanks, just in case.

I got out the solar/crank radio and flashlight in my 72 hour kit so I could see how long a crank would actually last as we listened. To my chagrin the radio didn’t work on crank power. I flipped the switch to solar and it worked! I was angry that the crank didn’t give me the power needed but thrilled that the solar worked since it hadn’t been charged for months.

We dragged out the new generator and were thrilled that it was fairly quiet. It is an inexpensive model so this was great news. We powered a computer and a few other things and everything went well. Now we have a gauge to calculate the amount of gas it uses per hour so we can be better prepared for a long outage and know exactly how to ration our resources.

For all the planning we have done and all the times the power has been out, we always learn something new or are reminded of things we have forgotten. I would suggest you choose a 24 hour period to live without electric power. You can leave the freezer and the refrigerator plugged in but treat them as though they are not. See what you learn and share it with us and others.

This week I noticed some of the big pharmacy stores have their paper towels on sale. I guess because of my own power outage and the solar flare reminding us just how real a threat of gird collapse is, a sale on paper products caught my eye. We already have plates and cups in our storage. This week add paper towels and napkins. Again, consider the number of people in your home and how many others will likely show up to be fed, and multiply by three meals a day when purchasing napkins. For paper towels consider how many times a day you pick up a sponge or wash cloth to clean up.

Friday morning I will be speaking with Halli again. We will cover our latest General Store purchases and I’m sure more about the solar flare. The great thing about her show is that we can change direction the morning of the show if a disaster should become evident even five minuted before broadcast time. Visit with us on Friday morning 7:00AM Pacific time. http://www.blogtalkradio.com/idahotalk

Benjamin Franklin said: “Diligence is the mother of good luck”

Let us be diligent

Sunday, July 25, 2010

Red or White Wheat?

Once again I am so grateful for all the amazing information that people have compiled about food storage and emergency preparedness. This week's favorite blog is Prepared LDS Family which posted the following guide on wheat.


Red or White Hard Wheat? Which should I put in my food storage?

Letter from reader: "My wife and I recently went to our local LDS Bishop's storehouse and bought/canned hard red and hard white wheat. I want to learn to cook with wheat, and have several LDS related books on "Cooking with Food Storage." The recipes for breads, muffins and cakes say to use "ground wheat", but it does not tell which kind (hard red or white). So my "question" is this. What type of these (two) wheats do you use for the different breads, muffins, cookie recipes when it only says in the recipe "ground wheat?" When you make "wheat bread" is it from Hard red or Hard white? What is the difference?" Bill, New York

Dear Bill:

Though I am not an expert on wheat, Chef Brad is. I've attended one of his cooking demonstration classes at BYU Education Week in Provo, Utah a few years ago, and he is wonderful! He lives in Arizona. He will be doing cooking classes again this year and they fill up quickly. However, if you can't attend a class, then check out his website below.

Chef Brad says "There are four major types of wheat available today: hard red, hard white, soft, and durum.

Hard red wheat is high in protein (10 to 14 percent) and can be sprouted. Although it is great for breadmaking, it is heavy and, as an acid-based grain, causes many people digestion problems.

Hard white wheat is also high in protein. A cross between hard red wheat and soft white wheat, it reatins the good qualities of both. Since it is an alkaline based grain hard white wheat is easier for most people to digest. It makes a very light loaf of bread.

Soft wheat
is low in protein and low in gluten (6 to 10 percent). Soft wheat is used in makeing biscuits, cakes, pastries, cookies, and pancakes.

Durum wheat
, the hardest wheat, is high in gluten and protein. Its hard starch granules hold pasta together in boiling water. Durum wheat is used for pastas and noodles.

Cracked wheat is whole wheat berries that have been cracked into small pieces between steel rollers, which reduces cooking time. Cracked wheat contains all the nutrients of the whole grain."

Personally I have hard red and white wheat in storage, though I have many friends who prefer hard white wheat for bread. I already had hard red wheat in storage before hard white wheat became popular. I use both for pancakes, waffles and bread and have had no digestion problems. Best wishes!

Check out ChefBrad.com for grain education, recipes, and cookbooks to purchase.

Chef Brad - Various types of wheat

Chef Brad - Grain Usage Chart

Menus to get you through an emergency or disaster

Prepared LDS family has compiled a 7-day menu plan to get you through an emergency or disaster. We've been emphasizing building up a three-month food storage of the foods your family regularly eats, but this 7-day plan is built around meal preparation without using electricity.

They bring up a good point. If all your menus require a stove and refrigeration, your family could get a little hungry if for some reason you loose power for several days. Her menus are just suggestions, but a good place to get started.


Emergency or Disaster Menus for 7 Days


Creating your own emergency menus for disasters will help you prepare for various emergencies like power outages, earthquakes, floods, etc. Keeping easy to prepare foods on hand is the key. Remember to also have ready made foods for infants. Include some of the items below in your emergency food storage. These simple menus do not require electricity. Most foods can be eaten cold, or heated on an outdoor camp stove or butane burner. Many of these items can easily be replenished as they are foods you regularly purchase. Start with a 7 day supply and then increase to 30 days if possible. Adapt the attached spreadsheet for your use.


Breakfasts:
1. Pancakes from mix, Pancake syrup, Canned peaches, Tang
2. Oatmeal w/pwd milk, Brown sugar, Raisins, Hot cocoa
3. Breakfast cereal, 2T powdered milk, Bread w/PB, Tang
4. 2 Breakfast bars, Canned pears, Boxed drink
5. Bagel, Jelly, Raisins, Apple juice
6. Oatmeal w/pwd milk, Brown sugar, Raisins, Hot cocoa
7. Breakfast cereal, 2T powdered milk, Bread w/PB, Tang

Lunch:
1. Cup o’noodle, Fruit snack, Beef jerky, V8 juice
2.Vegetable soup, Saltine crackers, Nuts, Pwd. Milk
3. Stew, canned, Ritz crackers, Pudding cup, Hot cocoa
4. Tomato soup, Saltine crackers, Fruit cocktail, Tang
5. Clam Chowder, can, Ritz crackers, M & M's, Boxed drink
6. Chicken Noodle, Saltine crackers, Almonds, Pwd. Milk
7. Ravioli's/Spaghettios, Banana chips, Fruit cup, Apple juice

Dinner:
1. Canned chili w/beans, Saltine crackers, Sunflower seeds, V8 juice
2. PB & J sandwich, Mandarin oranges, Cookies, Apple juice
3. Spaghetti w/jar sauce, Corn, canned, Dried apricots, Boxed drink
4. Chicken salad sand., Graham crackers, Applesauce cup, Hot cocoa
5. Macaroni & cheese, Carrots, canned, Fruit cocktail, Pwd. Milk
6. Tuna sandwich, Baked beans , Pretzels, Tang
7. PB & J sandwich, Mandarin oranges, Trail mix, Apple juice

Her down-loadable spead sheet is even easier to read.

Click here for her Food Storage and Disaster Calendar with helpful suggestions of what to buy each month to be well prepared.

Sunday, July 18, 2010

What's Your Grab-and-Go Plan?


I was feeling pretty confident about our 72 hour kit with extra water stored right by the garage door and our car's 72 hour kit in the trunk. But as I scrolled through this post tonight, the picture of the empty gas gauge triggered an unpleasant memory. Seventeen years ago we lived in Western Washington and experienced a severe wind storm that left many without power for several days. We were luckier - only one day. The deal breaker was I had neglected to fill the gas tank the night before and was unable to go anywhere until the nearest gas station reopened. Good reminder from The Ready Store that all of us need to review our family emergency plan.

What’s Your Grab-N-Go Plan?


While each potential disaster that you face will present it’s own unique challenges that you should plan for; with every disaster you need to determine if it’s going to require that you “Shelter-in-Place” or “Grab-n-Go”. If you’re facing a situation where you determine that you need to Grab-n-Go. There are a few fundamental things that you should plan on.

My brother is a member of a national emergency response team, USAR (Urban Search & Rescue), from the devastation of the World Trade Centers to the aftermath of Hurricane Katrina, he’s been sent in to deal with the after math.

In talking to him about Katrina he indicated that the items most people had wished they had above all else was Water, Food & Fuel. He indicated that a large majority were operating under the fallacy that in an emergency situation the government would be able to provide everyone with these necessities.

In a Grab-n-Go situation, take the following suggestions to get the most out of your plan:


1. Do Not Delay. If you decide you need to get out of town you need to have the mind set of getting out as quickly as possible. You don’t want to be stuck with the masses in bumper to bumper traffic in the middle of the freeway consuming what fuel you have while your vehicle sits idle. The rule of thumb here is that you make the appropriate plans to mitigate this possibility understanding that in some disasters it may be inevitable. It makes good sense to always keep your fuel level above half a tank. You should also have a couple of Fuel Containers on hand.

2. Know your destination - How severe is the disaster? Did it impact just your house, your neighborhood, your city, your state? You should designate destinations that are safely out of the disaster area but minimize the amount of travel required. If only your neighborhood was impacted, don’t waste time and effort traveling across state if it can be avoided.


3. Identify Alternative Routes - Take the time to identify multiple routes and take the time to drive these routes before hand. Using Google Map is a great start to laying out your routes, but it’s just a start. Driving your routes will give you a better understanding of which routes are likely to be congested or present other challenges.


4. Have Your Supplies Ready - When the time to act has arrived, the time to prepare is over. Not only should already have your food, water and emergency supplies already purchased, but you should also have them packaged, secured and in a place that’s easily accessible. There’s a reason we use the term Grab-n-Go. It’s not, Run-To-The-Store-Really-Quick-Throw-Some-Things-Together-And-Then-Go.

Don’t put off getting your Grab-n-Go plan put into place. Create a plan, write it down, get supplies and do a dry run and put you in your family in the best position possible to weather the storm!

Food Storage Comfort foods

After seven months of living on their food storage following my son-in-law's layoff, I asked my daughter what she would do different if she had to do it again. "I'd stock up on chocolate chips," was her ready reply. "When you can't afford to go out, chocolate chip cookies makes a great in-house family outing."

Who can underestimate the value of comfort foods in a time of crisis? The below article from the Emergency Preparedness Blog emphasizes that very issue.


Emergency Preparedness Guide - Article 17
Soul Soothing Sweets
By Angie Sullivan

Want to keep your family calm and happy during times of distress? Store some soul soothing sweets!

On our journey to preparedness, we've discussed several different types of foods to store. We've learned about dehydrated, freeze-dried, and Meals Ready to Eat. All of these are wonderful options, and a good combination of all of them is ideal. But here is something you might not know. Each of these foods has something in common, something that I'm sure will tickle your fancy. Within each of these foods storage categories there are some items I would like you to consider desserts!

If you are like me, it won't take much to convince you that having a few desserts or comfort foods stored is a good idea. But, if you aren't sure that having cake or pudding for your family in an emergency is really necessary, think about these few facts: Did you know that studies show that foods high in sugar, or food associated with pleasant memories can cause the release of certain chemicals that affect how we feel? In short, desserts can act as a natural mood enhancer. During hard times, such as the aftermath of a natural disaster, extended unemployment, or food shortages, having desserts on hand for your family will help to comfort them. It can be a reminder, especially to children, that everything is alright and good times are ahead.

Now that we have established that having food storage desserts on hand are a good idea (twist my arm!), let's talk about the different varieties you can choose from. As I mentioned before, each of the types of food storage have delicious options available. MREs have a wonderful assortment of ready to eat cakes and cookies. Can't imagine something in a brown military pouch can taste good? Think again! Want to make your own delicious desserts? You can purchase just add water dehydrated muffin and brownie mixes in #10 cans, along with puddings and even make your own homemade favorite peanut butter cookies or oatmeal cookies using dehydrated items such as peanut butter powder and oats. With the amazing technology of freeze dried foods, not even ice cream is out of the question!

Whatever your sweet tooth craving, or whatever your family's comfort foods are, you are sure to find something delicious to fit the bill. So consider spending a few of your food storage dollars giving your family some soul soothing sweets!

Thursday, July 15, 2010

Sugar free Apricot Nectar


Who can pass up 25 cent a pound apricots courtesy of the Shoenwald Family (via our great connection Gail Richmond in Ellensburg)? I brought home 100 lbs. (yikes!) and have my work cut out for me. Brother Shoenwald Sr. (sorry - don't know his first name), says their family favorite is apricot nectar and they make it with Splenda or half Splenda and half sugar. Good news for diabetics, he says Splenda actually preserves the beautiful orange-y color longer than the regular nectar.

In case you need an Apricot Nectar recipe:

Wash and pit 10 quarts of apricots and place in large stock pot
Add 10 cups of water and bring to a boil
Strain fruit and water through a colander into a second pan
Add sugar or Splenda to taste (I added 5 cups of sugar for one batch and 5 cups of Splenda to the second. It was still a little tangy, so I added a couple more cups of sugar). Stir and pour into clean quart jars and process for 15 to 20 minutes.

As an added bonus - the left-over pulp can be pureed in a blender and after adding sugar or Splenda to taste, poured into a cookie sheet lined with Saran wrap and baked in an 200 degree oven for 8 hours. The best ever fruit leather.

Friday, July 9, 2010

The science behind making bread

I grew up watching my mom make homemade bread and I've done my own share of baking, but I never understood the chemistry involved in producing this aromatic treat. Crystal at Everyday food Storage has a great video that explains the process:


I've tried her bread recipe and get raves every time I do:

EZ Wheat Bread recipe (I doubled this recipe in the video you watched)
1 1/4 cup warm water
1 Tblsp active dry yeast
1/4 cup honey or 1/3 cup sugar
2 3/4 cups whole wheat flour (or whatever combination white/wheat you like..I use 100% hard white wheat. To learn more about the different types of wheat, download my wheat handout)
1/4 cup wheat gluten
1 tsp salt
2 Tblsp nonfat non instant dry milk
1 Tblsp butter/margarine/oil
1 Tblsp vinegar
1/4 cup potato flakes (NOT potato pearls)
Mix ingredients in order listed in mixing bowl of mixer with dough hook attachment (like kitchen-aid) for 12-15 minutes. Let rise until double, 1- 1 1/2 hours. Punch down, and shape into loaf or rolls. Let rise again until double and bake 375 degrees for 20-30 minutes until golden brown and sounds hollow when lightly tapped.

If you are making this recipe in a bread machine, follow your bread machine’s directions for wheat or whole grain selection and add the ingredients in the order listed for their recommendations. (only one loaf will fit in a bread maker)

EZ White Bread
1 1/8 cups warm water
1 3/4 – 2 tsp active dry yeast
2 Tblsp sugar (you can use a little more sugar if you like your dough a little sweeter)
3 cups flour
1 Tblsp vital wheat gluten (remember you don’t need as much gluten if you’re not using whole wheat flour)
1 tsp salt
2 Tblsp nonfat dry milk
1 1/2 Tblsp butter/margarine or oil
1/4 cup potato flakes
(you don’t really need vinegar for white bread, remember the dough enhancers are primarily needed for whole wheat bread)
Add the ingredients in the order listed into a mixer bowl (like a kitchen-aid) with a dough hook attachment and mix on low for 10-12 minutes. Or mix it on the dough cycle in your bread machine.

After all the mixing is complete, if the dough still seems too gooey and you are unable to handle it, add 1 Tblsp flour at a time, and mix after each addition until the dough is manageable with your hands.
Let rise 45 mins -1 hour, punch down and use to make bread, cinnamon rolls, cookie sheet pizza, rolls, or anything else you can think of! Let rise after you have made your creation and bake according to the direction of the recipe you are making.

If you are making it into bread, form into a loaf at this time, place in a loaf pan, let rise in a warm place 45 min -1 hour and bake 375 degrees for 20-25 minutes until golden brown and sounds hollow when lightly tapped.

If you are making this recipe in a bread machine. Follow your bread machine’s directions and add the ingredients in the order listed in their recommendations. (only one loaf will fit in a bread maker)

Monday, June 28, 2010

Great Food Storage video!

Prepared LDS Family has an amazing food storage video on their site - the most comprehensive I've seen to date. Takes about 9 minutes to view - but well worth it!


Monday, June 21, 2010

Deals to Meals-beating Costco and Walmart prices

I'm so excited about a new site that I found courtesy of Foodstoragemadeeasy.net. Thanks again Jodi and Julie for some more great info.

The great site is called Deals to Meals and it is the slickest thing ever for combining economical grocery shopping while building up and using your food storage - especially for those who don't have time or interest in couponing.

It requires a monthly fee - $4.95 - which is cheaper than buying Sunday newspapers combing for coupons. Once you join, you click on your state and then the grocery stores you shop at. It pulls up the best deals from each selected store, shows in red the deals that beat Costco and Walmart prices, shelf life of the product, and the amount needed for a year's food supply.

They also have a meal planner section that incorporates the current week's good deals.

Amazing!!!

Monday, June 7, 2010

June stock-up items for 3-month food supply

The most economical way to build up your three-month food supply is to shop the sales and Prepared LDS Family has come up with a list of food and non-food items that typically go on sale during the month of June, particularly those that are bolded:

Shelf Stable Foods
Bottled water (look for $2.99 or less for 24 ct. case), powdered milk (LDS), dry beans (LDS), dry split peas & lentils, freeze dried vegetables, butter powder, dried fruits & raisins, salad dressing, croutons, lemonade mix, pancake mix, tapioca

Freezer
roasts, strawberries, sausage

Toiletries
contact solution, mouthwash

Paper & Cleaning
laundry stain remover, dish soap

Medical Supplies
vaseline, measuring spoon, assorted band aids

Family Emergency Kit Supplies Part 2
(items you share as a family in a grab and go container)
crescent wrench, duct tape, large flashlight, spare flashlight batteries, hand can opener, mess kits, disposable hand wipes, sunblock, insect repellant

Equipment & Fuel
lumber for food storage shelves, firewood, or cooler

Other items that go on sale in June: Summer clothing (back to school clothes will start filling shelves. So take advantage of summer clearances. My favorite time to shop!), dresses, summer sports gear, men's clothing (Father's day is a great time to shop for Christmas gifts too!), refrigerators, TV's, computers, electronics, fabrics, building materials, pianos, canning supplies

Friday, June 4, 2010

Another good reason why an emergency water supply should be your first priority

Who doesn't take their daily water supply for granted? Thank heavens I don't have to walk a quarter mile to get fresh water for cooking, baking and laundry like my great-grandmother did. Thank heavens my water supply is on-tap and abundant, but we have experienced enough well problems to know that supply can be interrupted without warning.
Below is a post from The Ready Store that re-emphasizes why an emergency water supply should be your first priority:


Turns Out it Can Happen in My Neck of the Woods

About three weeks ago on a Sunday night I laid down in my bed with a book to enjoy the end of the weekend. Unfortunately my stomach was little unsettled and was progressively getting worse. By the next morning I had full blown flu like symptoms.

A day or two later and a couple of my kids had the same symptoms and within two weeks everyone in the house had caught the bug. The day after my wife was finally feeling better we got a knock on the door.

A volunteer from the city was passing out fliers instructing all residents of my subdivision to boil all tap water before drinking. It turns out that somewhere the culinary and irrigation lines had crossed and as a result contamination occurred.

In the end hundreds of people were already sick before the city issued the boiling order. Within hours the local Wal-Mart and Grocery Stores were completely emptied of all bottled water.

It just so happens that also a few weeks ago, almost 2 million residents of Boston also lost their supply of drinking water due to a large pipe bursting and were issued order to boil all water before drinking.

When you read this, there’s two things you should consider…

It can and likely will happen in your neck of the woods. It may not be bacteria in the water or a bursting pipe that prevents you from using your tap water without boiling, but it might be a hurricane, tornado, earthquake, or some other natural or man made disaster. Whether it’s small town Utah or a major metropolis like Boston we’re all prone to disasters regardless of location.

Once disaster strikes, the time to prepare is past. If you’re not ready before disaster strikes you join the masses who scramble at the last second and scrap like a pack of dogs for a bone that’s already been picked clean.

The challenge with some people is just getting started. A slow and steady approach where you consistently add items to your emergency supply over time can place you and your family on firm ground where you have the peace of mind to face disaster head on.

Take the time to assess where you’re at and identify your weak points and then make the commitment to fill the gaps. In my case where we were under a boil order a couple of 5- Gallon Stackables and a MSR SweetWater Purifier System works well to help you ride out the storm.

Tuesday, May 18, 2010

How to turn off your water supply

Okay - maybe turning off your water supply in an emergency is a no-brainer for most of you, but for the rest of us with an underdeveloped left side of the brain - a visual "how-to" is pretty darn helpful. We won't mention the unfortunate broken pipe in the garage after a heavy freeze and thaw cycle and trying to dig through 3 feet of snow to even find the water supply shut-off. Let's just say - hurray for the Good Samaritan neighbor who showed up in the nick of time.

So here it is - another how-to video from one of my favorite blogs by Jodi and Julie at Food Storage Made Easy:


In an emergency situation where your municipal water source could be contaminated, it is important to immediately turn off the water entering your home from the main water line. This will help to prevent contamination and will allow you to use alternate water sources in your home such as: hot water heater, toilet tanks (unless a colored disinfectant was used), water pipes, soft water tanks, etc.

Since we did not know how to shut off the main water supply our homes, we commissioned Jodi’s sweet hubby to help with this instructional video. We all need to know how to do these things since you never know who will be home (or not home) when an emergency strikes!


If you live in a newer home you may have a shut-off valve in your house. This is nice because you can avoid the “spider problem” but can be bad if you have children that are rascals (see Julie’s water adventures story). So figure out what type of shut-off valve you have and make sure you know where it is and how to turn it off (and back on!)
Other helpful “Water” Resources

BabyStep 2: Water – basic information on how to get your 2 week supply of water
Alternate Water Sources – Sources of water both inside and outside your home
How to Make an Evaporation Still – Instructions for this method of collecting water
Water Purification – Methods of purifying water from outside sources

Friday, May 14, 2010

Three months food storage - the before and after views from foodstoragemadeeasy.net


Although you may not have enough extra storage space in your home to dedicate an entire closet to a three month food storage supply - it's helpful (thanks to Jodi and Julie at Food Storage Made Easy) to have a visual of how much room three months of food storage looks like. And it's not nearly as challenging as it may sound. The easy-to-assemble cardboard can organizers make it so much easier!

Tuesday, May 11, 2010

What does 3 months of food storage look like?

Last post showed what a bare minimum, keep you alive food storage for one looks like. If, however, the reality of living on beans, whole wheat and powdered milk for one year sounds a little overwhelming - Jody and Julie from Food Storage Made Easy just posted what a three-month-eating-what-you-normally-eat food storage looks like. At least the shopping part. Stay tuned for the on-the-shelf view sometime soon.


If you’re following Grandma Lori’s Extreme Food Storage Makeover, you know that last time we left off with a “to be continued” after Julie made Lori her full shopping list based on her recipes she wanted to use in her three month food supply. The post was titled “We have a Plan”

Well last week Julie was running out of ideas for Mother’s Day presents so she called up Grandma Lori and said, lets get this shopping trip done! (Because once the shopping was done, she could do the real present – which is organizing the whole food storage room) Grandma Lori wanted to go ahead and buy all the food up front, then replace through normal use, and sale shopping…. So it made for a big shopping trip to say the least.

Surprisingly however, the shop wasn’t NEARLY as painful as we thought it would be. We took the excel file that had calculated exactly everything she needed and used it as our shopping guide. Before we went to the store, we took inventory of what she already and then we were actually in and out of the store fairly quickly.

Saturday, May 8, 2010

Bare minimum food supply for one year


Thanks to Erika Grover and Gail Richmond for this visual of what a bare minimum food storage for one person looks like. It's not fancy, but it will keep you alive. Kinda reminds me of Moses leading the children of Israel through the wilderness. I can imagine the kids waking up every morning and saying "What - manna again?" But it sure beats starvation!


EXACTLY WHAT DOES A 1 YEAR FOOD SUPPLY FOR 1 PERSON LOOK LIKE?
These are the MINIMUM Basic Amounts of Food Needed for Survival for ONE PERSON for ONE YEAR:


BARE-MINIMUM LDS Church Food storage requirements for
1 adult male for 1 year Approx. 2,300 calories per day. (only 695lbs total)
Some people try to rationalize that we "really" don't need to store everything that we have been asked to store. The regular excuses of no money, no room, no time, don't know how to use wheat, or don't eat wheat, etc. Some have heard "that is so much to store", that "our family would never use 400 pounds of grains per person in an entire year". Also, "we don't use that much salt or oil", therefore they don't feel they need to store it."


This food can be purchased at a grocery store. It’s not overwhelming when you see it this way, it’s impressive!

With these ingredients pictured (and adding yeast which we know is not on the basic list – but hopefully we have stored), we would be able to make one loaf of bread and 1/3 cup of beans. That would be your food for the entire day. Beans and wheat make a complete protein that will sustain the health of the body.


* Protein is essential for many bodily processes, including building and repairing tissue. You use protein to make enzymes, hormones, and other body chemicals. Plus, your hair and nails are mostly made up of protein. It is an important building block of bones, muscles, cartilage, skin, and blood.
* Foods can be combined to make complete proteins like pairing beans with rice or corn. There are other combinations as well. Beans and seeds, beans and nuts, and beans and grains will form a complete protein. Protein is necessary for building/rebuilding healthy tissue in the body.

DON’T FORGET THE WATER!
· 14 Gallons per person per 2 weeks.
· For long term emergency use, you might want to consider an emergency filtration system (filtering straws, bottles, etc.)

Monday, May 3, 2010

Home Depot Garden Club


Okay - it is May and it's snowing outside, but summer is still coming (even if spring is a little iffy). If you love to garden or wish that you knew how to garden, Pinching Your Pennies (PYP) just posted a link to the Home Depot Garden Club. It offers all kinds of great tips by climate zone and some great gardening coupons if you join.

Get HOT coupons!
Home Depot Garden Club

This is a HOT one! The coupons they send are great.

Join now for FREE and get:

* Exclusive members only coupons and savings delivered right to your inbox.
* Timely regional tips and advice, delivered biweekly.
* Expect answers to your gardening questions within 24 hours.

LINK TO SIGN UP

Here is a sample of the coupons they've sent in the past:

* Buy one Tree, get one FREE (of equal or lesser value)
* $3 off 5M or $6 off 15M TurfBuilder with Summerguard Lawn Fertilizer and Insect Killer
$3 off Cutter Bug Free Backyard Hose End or Concentrate
$1 off 32 quart or $2 off 64 quart or Miracle Gro Moisture Control Potting Mix
* $3 off a Propane Exchange or $4 off any New Tank purchase.
$2 off any Clorox ProResults Outdoor Bleach 32 oz.
$4 off Weed-B-Gon Ready-To-Spray concentrate of any Quart concentrate

Wednesday, April 28, 2010

Pressure Cooking beans, rice and wheat!

The pressure cooker on-line class continues thanks to Crystal at everydayfoodstorage.net.
Learn how to cook beans, rice and wheat in a fraction of the time.


Monday, April 26, 2010

Free online pressure cooker class!


Pressure cooking is faster and more nutritious (and a great facet to Provident Living!). But pressure cooking can be scary if you don't know how to properly use one. Go to this link everydayfoodstorage.net for two instructional videos on all you need to know about pressure cooking.

Saturday, April 24, 2010

Stockpiling tips


My killer stockpiling deals this week included $1 barbecue sauce to make barbecued chicken and $1 granola bars for my granddaughter. We all stock up on the things our family loves, so it makes sense that we do the same with our food storage. During the middle of a crisis is not a great time to introduce your family to new, untried foods. I liked the following stockpiling tips from a post on Preparedness Pantry:


Stockpiling or building a usable food storage supply is important for me and my family. I like to have several months of food on hand that we eat on a regular basis. When an emergency arises I know we will be fine for many of the basic necessities. I do this by combining sales with coupons (when available) to get rock-bottom prices. I stock up when the price is the lowest! However, in my eleven years of marriage and avidly doing this, I have found there are some mistakes you don't want to make!

1. Take note of when certain items go on sale and plan accordingly.

In the past I have become really excited about great sales, only to find later on lots of what I had purchased was stale. So now I try to only buy as much as I know we will eat before the next sale hits. For example, a local store has a really good oatmeal sale twice a year. That's when I stock up on my oatmeal. I buy enough to last us until the next sale, unless the expiration date is over a year away.

2. Only buy what you know your family will use.

It can be tempting to buy everything you see on sale, clearance, or free after rebate. But for me, I only have so much room in my house and I can only afford space for the items I know I will use. I have learned over the years certain things we just don't use, so I leave them for others to get.

3. Try a new food item first before adding it to your stockpile.

I only made this mistake once. I don't see the point in buying 20 boxes of a new kind of granola bar if we won't eat it. Buy one box on sale, try it first, then go back for more if you like it.

4. Don't stockpile items that are soon to expire.

Watch those expiration dates! Many times at cheap sales I have noticed in the store the expiration date is only a month away. No use buying 20 boxes to last a few months! No one likes stale food. Even deodorant and toothpaste lose their effectiveness after the expiration date.

5. Remember there is always another sale.

I have also learned not to go too crazy at sales. There will always be another sale! If you buy a ton of cereal at one sale you won't have much of a variety. Not that I don't stockpile a lot of cereal, because I do. I have just found we like variety so I try to balance it out between sales.

6. Don't let your food or other items go to waste.

Organize your stockpile or food storage. Know where everything is, and rotate it. My house is fairly small, but I know where every tube of toothpaste and every jar of salsa are.

Besides food, I also keep non-food items in my stockpile. These are some of the things I try to always have on hand and never run out of:

* Water
* Diapers
* Formula
* Batteries
* Duct tape
* Toilet paper
* Toothbrushes
* Toothpaste
* Feminine hygiene supplies
* Soap
* Bandaids
* Lotion
* First aid supplies
* Medicine (for adults and children)
* Multivitamins

Tuesday, April 13, 2010

Time to start thinking about gardening!


Well...actually the rest of the known world is gardening while Upper Kittitas County waits for all the snow to disappear off Goat Peak. Planting before Memorial Day is always a gamble, but it's still a great time to start planning ahead.

Emily at mysquarefootgarden.net has a great garden plan that you might want to check out. She does square foot gardening which eliminates weeding (always a good thing!), but says the plan can work for traditional gardens as well.

You can also sign up for her weekly email reminder of what you should be doing in your garden by climate zone. We're in the violet zone - and according to her - it safe to plant peas. Since last week's snow is gone - I just may try it!


(click on the image to view the entire garden plan)

Tuesday, March 30, 2010

How to turn off natural gas

Being the non-mechanical person in my family, there a lot of little (but potentially) critical things that I've never learned how to do in case of an emergency. Apparently, I'm not the only one. A recent post on Food Storage Made Easy features a video showing how to turn off the natural gas in case of an emergency. The hosts, Jodi and Julie realized they had assigned that responsibility to their husbands and needed to know. If you (like me) don't know how - watch this:


How to Identify an Outside Gas Leak:

* Hissing, roaring or blowing sound
* Dirt being blown into the air
* Water being blown into the air at a pond, river, or creek
* Continuous bubbling in wet, flooded areas
* Fire at or near exposed piping
* Flames apparently emanating from the ground
* Dead or brown vegetation in an otherwise moist or green field
* A “rotten-egg” odor (this is the most common sign inside your home)

Important Reminders:

* The gas company has to come and restart your service if you shut off the gas, so make sure you only do it IF you identify a leak. If there is no leak then it is not necessary to turn off your gas.
* If a gas leak is discovered, turn off any potential “ignition” sources and evacuate everyone from the area
* Do not attempt to make repairs or extinguish fires

Taken from information found in the Questar Gas monthly newsletter

Monday, March 29, 2010

Make your own fabric softener sheets

Here's a great money saving suggestion from the Pinching Your Pennies website for making your own fabric softener sheets.

Suggestions for making your own fabric softener dryer sheets:

* Mix 1 cup liquid fabric softener with 2 cups water in spray bottle. Spray a clean rag or washcloth 4-6 times with the mixture and then put the cloth in with the clothes to dry. Wash the rag occasionally to remove build-up.

* Dip a washcloth in liquid fabric softener, then hand to dry. Once dry, put the washcloth in with the clothes to dry. The washcloth can be used a dozen or so times before needing to be washed and re-dipped. You can make your fabric softener last even longer by dipping the washcloth in a mixture of equal parts water and liquid fabric softener. Or try a different ratio to see what works best for your laundry.

* Take a large jar or bucket, cut a sponge into 4-6 pieces, and place them in the container. Add a few capfuls (if using jar) or one full bottle (if using bucket) of liquid fabric softener, then fill the rest of the way with water. When you go to dry a load of laundry, take out a sponge, ring it out and throw it in the dryer. When done, just put the sponge back in the container for next time! (Tip from PYP member, WtrmlnLisa)

* To control static cling, try adding a wad of aluminum foil to your dryer load.

* If using dryer sheets, cut them in half and use only one half sheet per load. That way a box of 80 sheets automatically becomes a box of 160! (Tip from PYP member, tightwadteri)


Even if you don't want to make your own dryer sheets, you can get extra use out of the commercially packaged ones by using the used sheets to dust around the house or clean bathtubs (they are great for removing soap scum).

Saturday, March 20, 2010

Easter Wheat Grass

Here's a great way to use your food storage wheat that's both healthy and Eastery cute. How can you loose? Thanks to Jodi and Julie at Food Storage Made Easy for sharing this great idea!

How to Grow Easter Grass with Wheat

This is such a fun activity to do with your family. I learned about it at my son’s preschool and knew that I had to post it here for you all to enjoy. Make sure to do it 2-3 weeks before Easter so you can have enough time for your grass to grow! (hint that means you better do it in the next day or two!!!) Hope you have as much fun doing this as we did.

How to Grow Easter Grass With Wheat – Instructions

Step 1: Soak a heaping cup of wheat kernels in a bowl of water overnight.

easter grass 1

The wheat should have teeny tiny sprouts. Aren’t they cute?

easter grass 2

Step 2: Line your Easter basket(s) with saran wrap.

easter grass 3

Step 3: Fill the basket with soil

easter grass 4

Step 4: Soak the soil with water, get it nice and wet

DSC00083

The kids think this part is really fun :)

easter grass 6

Step 5: Spoon a thick layer of wheat onto of the soil. Mist with a little more water.

easter grass 7

Doesn’t that look so nice?

easter grass 8

Step 6: Wrap the basket(s) in plastic or a ziplock bag. Try to make it airtight.

easter grass 9

Look how cute our baskets (and kids) are before the plastic.

easter grass 10

Step 7: Set in a warm place and leave the plastic on until most of the seeds have started to sprout grass. Remove plastic and mist daily if it looks dry.

Step 8: Enjoy a nice thick blanket of REAL Easter grass in a few weeks!

easter grass 11

Don’t forget to try to have at least one accident along the way. It makes life exciting ;)

easter grass 12

HAVE FUN and HAPPY EASTER!!!

Thursday, March 18, 2010

water storage

Here's a great post from Emergency Essentials about storing water:

Store for Thirst First!
By Angie Sullivan

I felt like I couldn’t last an afternoon without my bottle of water, so how would I fare in an emergency?

The other day, I spent the afternoon helping at my daughter’s school. I usually carry around a bottle of water with me, but I had forgotten my bottle in the shuffle of bringing in supplies. I came home later that evening and downed a HUGE class of cold water. As hungry as I was, it was the water that I was really yearning for. It was then that I began to think about this new journey of Preparedness I was planning on taking with you, and it struck me that if I could barely go a few hours without getting uncomfortable without water, it should be top on my preparedness priority list!

How long can a human survive without water? Most sources cite that the human body cannot survive without water for longer than 3-4 days without doing damage to bodily organs. Beyond 4 days, all the food in the world would do you no good without water. For this reason, I decided to focus on water storage for our first landmark on our trip to Destination Preparedness!

Emergency Essentials Inc., suggests that the first place I needed to store water was in my 72 hour emergency kits. You remember those! The pack of survival items you need if you had to get up and go with your family. Of course, you can choose to outfit your pack with basic water bottles. They are easy to find at your local grocery store. If you would like something specifically made for long term storage, you can store a metalized water pouch or box. These nifty little containers look a lot like those juice boxes or pouches you’d put in your child’s lunch box. They are specially treated, filled with purified water, and are specifically made for long term storage, just perfect for that emergency kit!

Now that you have your survival stash for the first three days of an emergency, what about storing water in your home? Did you know that you should consider having both stationary and portable water?

Boxed water containers and water barrels are the least expensive and most space efficient way of storing large volumes of water.

Portable water is stored in containers of approximately 5 gallons or less (remember 8 pounds per gallon!) These are very helpful to have on hand for transporting your stored water to a usable location, like your car if the emergency requires leaving. Once the water has been used, simply fill up the jug again from your stationary source. Five gallon jugs are a great choice for your portable water storage. You can also use washed out plastic soda pop bottles, but be sure to clean them out well and store them away from light and other storage items that could be damaged should the bottles leak. Do not use milk jugs, they are much more prone to bacterial growth and the plastic breaks down over time. The key to good water storage is to have a clean, sturdy container that protects against light penetration. This key inhibits bacteria growth. One of the best ways to store a portable source of water is a boxed water kit. These kits come with a metalized bag that you fill with water and then place in a sturdy cardboard box. Do you want to know the coolest thing about these kits? In an emergency, the sturdy box can double as an emergency toilet! Love that!

The most common containers for larger amounts of stationary water storage are those blue water barrels you see around. These heavy-duty, thick, polyethylene barrels are made of food grade materials. Barrels made for water are usually blue. Color is important, as blue means water is stored, and red indicates fuel. (Remember those fuel containers for your lawn mower?) Be aware that other colors may not be made of food grade plastic. You can purchase these barrels in many sizes. I’ve found that 55, 30, and 15 gallon are the most common. Try and store your blue barrels in a cool, dark area. A basement is a perfect option. Make sure there is an insulation barrier between the barrel and the ground. I’ve got mine perched upon some wood leftover from a home improvement project. It is not recommended to store your barrel outside, but if it is absolutely necessary, be sure to keep the barrel out of sunlight and be careful not to fill it too high! It is also wise to insulate the barrel and protect it from the elements as much as possible. You need about 1/10 of the barrel empty to allow for expansion should it freeze. This is not ideal, so don’t put it outside unless you have to. Oh, and don’t forget to grab that bung wrench and siphon pump! They are the tools you’ll need to open your barrel and siphon the water out!

So the next question that sprung up in my mind was how much water should I store? I discovered that experts recommend storing a minimum of 14 gallons per person. This is a two week supply if you store the minimum one gallon per person per day suggested for drinking and light sanitation. Light sanitation? I sit here thinking about my own family of five, four of which are females. I can’t imagine this gaggle of girls using just one gallon comfortably. For this reason, I’ve decided we are going to store some extra for our next emergency.

Have we quenched your thirst for knowledge on water storage? I hope so! You are now ready to equip your family with the most necessary of all supplies! WATER!

Saturday, March 6, 2010

The 15 minute 72-hour kit

I had someone question me a couple of months ago on the need for a 72-hour kit. What, really could go wrong in Upper County that would necessitate a 72-hour kit in the first place? That was 4 major earthquakes ago all over the world and I think it's fair to say that Upper County is just as vulnerable to an earthquake as anyone else along the Pacific Rim "Ring of Fire." Remember 2001's Nisqually Quake? We got Seattle's hand-me-down version that rattled windows (and nerves), but experts keep predicting the BIG ONE in the Puget Sound area. Hopefully none of us are over there shopping when it happens, but we'll feel the effects one way or the other.

All to say - what kind of emergency stuff to you have on hand? Here's a partial post from the "Pinching Your Pennies" blog that gives a very basic, 15 minute version of how to put together basic kits for your family that's worth reading:


"...I'm a firm believer in the idea that ANY preparation is better than no preparation at all. So I wanted to find a way to put together a bare-bones, bare-basics kit that wouldn't cost much money and could be thrown together in a matter of a few minutes so that it would be done and ready should the need ever arise.

In an emergency situation, the top priorities are water, wound care and sanitation/hygiene. You can go a few days without food. You can go for weeks without a shower or brushing your teeth or shampooing your hair if you had to (no, it wouldn't be pretty, and it might be downright miserable, but you'd at least survive).

But you CAN'T go for very long without water. And if you happen to get a wound (which is quite likely in an emergency) and it gets infected and is untreated, you just plain WON'T be able to go for very long - period.

With that in mind, I rummaged through my house to come up with the items that I felt were a bare-minimum for an emergency kit. These are kind of the essentials for sustaining or preserving life. Here's what I came up with:


small backpack
sweatshirt/jacket
bottled water [it's not the recommended 3 gallons, but it's certainly better than nothing, and you can add more if space and weight allow]
assorted adhesive bandages
antiseptic wash (or alcohol wipes or iodine)
antibiotic ointment
otc pain relievers
any prescription meds you take on a daily basis
food for 1 day [I just grabbed 6 granola/nut bars - convenient, no cooking required, and could be easily rationed if needed]
bar of soap
washcloth
roll of toilet paper
(for the gals) feminine hygiene products

[If you have a young child, you might want to include a baby blanket, cloth or disposable diaper(s) and possibly a bottle and formula]

It took me about 15 minutes to gather all these items. There was still about 6 inches of room at the top of the backpack, and even with the water bottle included, the entire pack only weighed 5lb 10oz. It was fast, cheap (all items came from around my house already) and lightweight.

Remember, this is not a deluxe version. This is just a quick put-together kit that you can do on the cheap that will get you started. But even this bare-basics kit will still get you a lot farther in an emergency situation than having no kit at all.

Of course, the idea is that you can then add to and customize your kit as time and finances and circumstances allow. There are many more things you might want to add if space and weight will allow. But even if you don't add anything else, at least you'll have something put together should the need ever arise (but hopefully it won't).

Here's a quick list of other things you might want to add on (and this is by no means an exhaustive list):

flashlight
trash bag/rain poncho
copies of important documents (birth certificates, IDs, contact information, etc.)
additional first aid supplies
change of clothes and additional cold weather items (hat, gloves, etc.)
additional personal hygiene items (shampoo, toothpaste, wet wipes, razor, etc.)
knife or survival tool
additional food
whistle
matches
solar blanket
water purification tablets or water filtering device
hand sanitizer
etc."

Friday, February 26, 2010

Okay - I'm finally starting to get it. Freeze-dried food makes sense if you want to throw it on a shelf and never think about it again. Anything less and you have to get into the rotating thing. Here's a post from Prepared LDS Family about shelf life for #10 cans that was an eye opener for me.

Can You Bake with Old Food Storage Flour?

Today I tried to use some outdated white flour stored in #10 cans. In the past I have been able to use outdated grains such as oats with no problem. But this flour had a tinny smell, and even a tinny taste. But I thought I would try it in my muffins just to be sure and sifted it to remove some lumps. The muffins were NOT good. They were not light and fluffy and the taste was definitely off. I had personally canned this flour in October 2002 so it is 7 1/2 years old. But it hasn't always been stored below 75 degrees Fahenheit so I did lose some of the shelf life. The shelf life on this #10 can said 5 years (if stored below 75 degrees) which is a shorter-shelf life than other whole grains. And I believe it. So, as you store your flour, understand that it may not last as long if you store it above the recommended temperature. If anyone else has experienced this, please share

Wednesday, February 24, 2010

Freeze dried or dehydrated?

Great info from The Ready Store Blog on food shelf life, particularly the pros and cons of storing freeze dried or dehydrated food:

Food in your pantry

This is the starting point for your food storage. Depending on your family size, having enough food to last you at least two weeks in your pantry is one of the most cost effective ways to have food stored. I came from a large family, so we had a large room where we stored many weeks worth of food. It worked great for the family because my mom rarely had to run to the grocery store in a hurry. She would use our storage room as her grocery store and then restock that when she went shopping. I strongly recommend having a well stocked pantry with food that you are eating and will eat.

Here are a couple things to keep in mind:

  • Make sure you buy food that you’ll eat – I see people make the mistake of buying canned food at a case lot sale, but it is food they never want to eat. So even though the food was a great price, the food just sat in their pantry.
  • Shelf life – This brings me to my next point of the shelf life of wet packed canned from you local grocery. The best rule of thumb is that your canned food will last at least 2 years. A lot of canned food will last much longer than that, maybe even up to 5 years. Foods that are high in acid content such as tomatoes and fruits will be closer to the 2 year range. If the canned food is past the expiration date, you should carefully inspect the food (the sniff test) and then make your best determination whether it is still safe to eat.

Once your pantry is stocked and you feel comfortable there, you need to consider more long term food storage products. These fall into three main categories:

1. Dry bulk food items

2. Dehydrated foods

3. Freeze-dried foods

Dry bulk food items

The items in this category include wheat, beans, rice, rolled oats, sugar and other staples. They are typically bulk packed in either cans or buckets. These items can be good to have around, but here are a few things to keep in mind:

  • Preparation - It is difficult to turn these dry bulk food items items into something edible. If you are going to store food in this way, then you have to go all the way. You will need wheat grinders, lots of fuel (to cook these items into something edible) and additional ingredients to make the food usable. Just the fuel alone will be difficult to store and in the quantities you will need. So just remember, you have to go all in with this approach or you won’t be able to use it when you need it.
  • Shelf life – Most of these items will store for a very long time. If stored properly, the wheat, beans, rice and oats will store for many, many years and probably many decades.
  • Taste and Nutrition – These dry bulk storage foods typically will give you excellent nutrition. As for taste, that depends on what you can make out them. A pot of beans, doesn’t taste that great without some other ingredients added to it.

Dehydrated Food

This type of shelf stable food is processed using high heat. The high temperatures remove the moisture from the food which gives allows for the extended shelf life. The two things that really affect shelf life are moisture and oxygen. Here are few things to consider with dehydrated food:

  • Shelf life – because of how the food is processed, the shelf life for most dehydrated items is 5-10 years. A few items might be a couple years longer and a few items might be a couple years shorter (such as dairy). So all that being said, dehydrated food is on the shorter end of the spectrum for long term shelf life.
  • Taste and nutrition – again, because of how the food is processed using high heat, it actually damages the food and removes nutritional value as well as flavor. You will find with dehydrated food that it just won’t taste quite as good (sometimes it will taste awful!) and the food will look a little off.
  • Preparation – most dehydrated food requires that you add and cook it. This requires fuel and a stove to be able to do so. It is easy to prepare, but it does take time. For example, dehydrated soup mixes will require cooking for up to 30 minutes. Over time that will use a lot of fuel.

Freeze-dried food

Freeze-dried food uses a unique process to make the food shelf stable. Rather than using high heat, it uses low heat in a vacuum chamber to slowly remove the moisture from the food. Because of how it is processed, the food retains nearly 100% of the natural nutrients, enzymes and taste. Freeze-dried food is my choice for long term food storage because it is the best in all three categories. Here are a few things to consider with freeze-dried food:

  • Shelf life – freeze-dried food will give you the longest shelf life. You will get at least 25 years and more than likely much longer. I have heard of 40 year old freeze-dried food being tested and it has lost very little taste or nutritional value.
  • Taste and Nutrition – This is another outstanding quality of freeze-dried food. It tastes like fresh food. The entrees, fruits and vegetables taste fresh and not processed. The flavor isn’t muted or dull. It will also retain the same texture, color and look of the fresh food. Because it is processed in low heat, the food retains 99% of all the fresh vitamins, nutrients and enzymes of the fresh food. This food tastes so good that I eat it regularly for my lunches and I know many other people that do the same.
  • Preparation – again, another exceptional quality of freeze-dried food is how easy the preparation is. This food is designed for just add water simplicity. All you have to do is add hot water, stir and wait about 5 minutes and you have a meal. Because of that, your fuel costs are very low and you don’t have to spend valuable time in the preparation.

Remember with food storage that the most important thing is to start. But, I want to make sure you are spending your hard earned money on a product that you will use and will last.

Friday, February 19, 2010

Instant Milk vs. powdered milk

Here's a post from "Pinching Your Pennies" clarifying the differences between instant and powdered milk that you might find helpful:

Hey everyone! This is Sara Hanks from Shelf Reliance, www.shelfreliance.com

As someone who loves milk and drinks it with every meal, I really appreciate the dairy products that Shelf Reliance offers with THRIVE Foods. You can find two varieties of milk – Instant Milk and Powdered Milk – that are healthy and simple to reconstitute, as well as cheese and a great chocolate drink mix that’s perfect for hot cocoa.

Since I’ve been at Shelf Reliance, I’ve encountered a lot of people who wonder about the difference between Instant Milk and Powdered Milk. It’s a valid question to ask, and there are many possible answers I could give, but the most basic difference between the two is what they’re meant to be used for. In a nutshell, THRIVE Powdered Milk is great for cooking, while THRIVE Instant Milk is more of a drinking milk. If you’d like a more lengthy explanation, keep reading …


Instant Milk is made completely from dairy, so it’s more well-suited as a drinking milk rather than a cooking milk (though it works just fine with recipes, too). THRIVE Instant Milk also dissolves quickly (instantly, as a matter of fact) in water at any temperature; this makes the instant milk convenient to reconstitute. Instant Milk has a good amount of both calcium and protein.

Powdered Milk is made from part dairy and part soy, and it will taste similar to any skim milk you might use. It’s best used for cooking, although, of course, it’s completely safe and fine to drink. THRIVE Powdered Milk also costs a bit less than Instant Milk, and as a good source of calcium and vitamin A, it’s a great choice for your food storage.

There you have it! Including milk and other dairy products in your food storage will mean greater health and greater variety for meals and recipes, and now that you know how to best use both Instant and Powdered Milk, you’re ready to use them for all your future dairy needs.

Monday, February 15, 2010

So...after spending a really long time in Fred Meyers, I shopped my way into a 72-hour office/car kit. I'm happy to report it's all packaged and in the car -hopefully never, ever to be used. Great experience, but all-in-all, I'm thinking that buying the prepackaged kits like those offered at Emergency Essentials is the way to go. Jodi and Julie at Food Storage Made Easy.net have done some research that makes the selections easier. Below is their results:


Bottled Emergency Kits {more info}
Bottled kits are economical and contain basic emergency supplies neatly packed into a 32 oz. water bottle for easy transport. They contains items such as hand & body warmers, ponchos, emergency blankets, matches, flashlights, whistles, basic first aid kits, and more.

Starter Emergency Kit {more info}
This can act as a basic kit or an add-on to any other emergency kit for additional people. It includes food, water, light, warmth, communication, and more.

3-Day Lite Emergency Kit {more info}
This economical kit gives you the basics you will need in an emergency. It includes food, water, warmth, light, communication, and first aid all packed in a medium backpack for easy transporting.


Roadwise™ Emergency Kit {more info}
This kit includes items specially selected for storage in your automobile.

3-Day Emergency Kit {more info}
Calorie food bars and aqua blox allow this kit to be stored in varied temperatures so it can also be used as an auto emergency kit. It contains basic food, water, warmth, first aid, light and communication items all packaged in a medium sized backpack. Recommended for one person for up to three days.

Trekker™ Kits
These kits are designed for either one (Trekker I™),
two (Trekker II™), and four people (Trekker IV™). The Trekker II™ Kit was rated ‘Best Value’ by the Wall Street Journal. These kits contain calorie food bars, aqua blox, and over 120 (Trekker I™), 150 (Trekker II™), and 275 (Trekker IV™) additional preparedness items. Some additional items found in our Trekker™ Kits that are not found in our 3-Day Emergency Kit are fire starters, purification tablets, more extensive first aid kits, additional hygiene items, and larger backpacks for storing the additional items.

ReadyWise™ Kits
Our ReadyWise™ line combines portability with convenience and ease. In addition to calorie food bars, these kits include MRE’s and MRE Heaters providing additional variety and nutrition. They offer a more comprehensive first aid kit when compared to our Trekker options as well as some additional items including a wool blend blanket, flashlight with the ability to charge a cell phone, and some emergency tools. ReadyWise kits are available in either 1 person or 2 person kits.

Comp™ Kits
Comp™ is short for ‘comprehensive’ which is the word that best describes this line. We have combined the convenience and ease of MRE’s and MRE Heaters with over
280 (Comp I™) and 390 (Comp II™) emergency supplies. These kits offer improved warmth, cooking, light and communication, first aid and sanitation, storage and tools supplies when compared to other kits. Some additional items that are unique to this line include an emergency toilet and water storage kit, our finest first aid kit in any of our 3 day kits, survival book, sewing kit, tri-fold shovel, and Deluxe Hiking Pack.

We hope you find this information helpful when selecting your Disaster Kits!

Wednesday, February 10, 2010

This week's grocery shopping deals

Here's some of my personal favorites for stocking up this week. I confess I'm just not a Super 1 shopper - but I've included a few things this week.

Super 1
Hot house tomatoes 98 cents a pound
asparagus $1.28 a pound (Albertsons is running theirs for $1.88)

Albertsons
Bumble Bee Chunk tuna 2/$1
Breyers Ice Cream 2/$5.00
Albertson Fruit Snacks $1.00 (great for 72 hour kits!)

Fred Meyers
In store coupons:
Fred Meyer butter 3/$5
General Mills Cereal 5/$10.00
Fred Meyer XLarge Eggs dz 2/$3
2 lb. peeled mini carrots 99 cents eacg
Fred Meyer Yogurt 10/$3

Safeway
Braeburn apples 58 cents a lb. (Sat. through Tues. only)
Betty Crocker cake or brownie 69 cents
Foster Farms Split Chx breasts 99 cent a lb.
Safeway Variety Bread 99 cents
Airborned Health Formula BOGO
Johnsonville breakfast sausage BOGO

Stockpiling food as a hedge against inflation?

Who doesn't need to supplement their income in an inflation- riddled, down economy? If you've noticed that it takes more money to buy less, you're not alone. A 2008 article in the Wall Street Journal entitled "Load up the Pantry" http://online.wsj.com/article_email/SB120881517227532621-lMyQjAxMDI4MDI4MjgyMTI1Wj.htm discussed the realities of inflation and advised stockpiling food as the best hedge against the shrinking dollar (not to mention a good way to practice that Provident Living concept!).

Some other provident living related sites you might enjoy...

http://thepioneerwoman.com/cooking/
This is what happens when an enterprising woman combines humor, cooking and photography. Entertaining and very informative. Try her apple dumplings - to die for
http://thepioneerwoman.com/cooking/2008/02/apple_dumplings/

And...click on the icons below for some great suggestions of things to make for your family or home on the cheap.